Unlocking the power of Adobe Illustrator for vector graphics design can seem daunting, but mastering its core tools and techniques opens a world of creative possibilities. This guide provides seven essential tips, progressing from fundamental skills to advanced applications, ensuring you can confidently create stunning vector art. We’ll cover everything from basic shape manipulation and layer management to the nuances of blending modes, pattern creation, and the effective application of design principles.
From crafting simple logos to intricate illustrations, this guide provides a structured approach to learning Illustrator. We’ll explore practical examples and step-by-step tutorials, equipping you with the skills to create professional-quality vector graphics for a variety of projects. Whether you’re a beginner or looking to refine existing skills, this comprehensive guide will elevate your design capabilities.
Mastering Basic Tools and Techniques in Adobe Illustrator
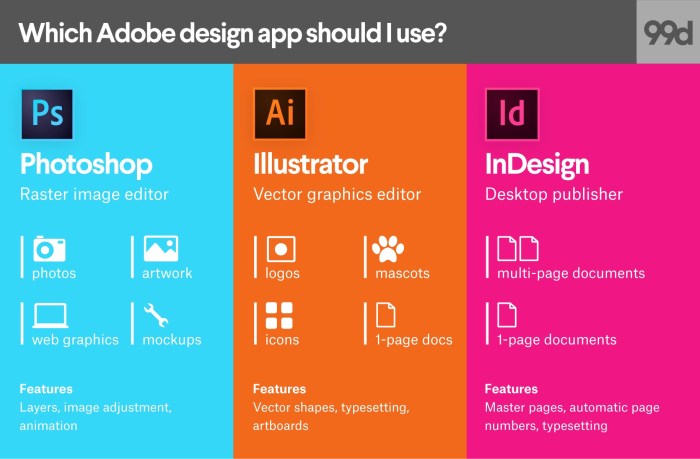
Adobe Illustrator is a powerful vector graphics editor, but mastering its tools and techniques is key to unlocking its full potential. This section will guide you through essential tools and workflows, enabling you to create sophisticated designs efficiently. We’ll focus on practical applications, providing step-by-step instructions and explanations.
Designing a Simple Logo with the Pen and Shape Tools
Let’s design a simple logo representing a stylized mountain peak. First, we’ll use the Pen Tool to create the mountain’s Artikel. Begin by clicking to create anchor points, strategically placing them to define the mountain’s curves. For smooth curves, click and drag to adjust the handles emanating from each anchor point. Once the Artikel is complete, select the shape with the Selection Tool. Next, use the Shape Builder Tool to easily subtract sections to create a more complex shape or use the Pathfinder Panel (detailed below) to achieve similar results. Finally, add a simple sun using the Ellipse Tool, and position it appropriately above the mountain. Fill the mountain with a gradient (explained later) and the sun with a solid yellow. The result is a clean, simple logo crafted using only basic tools.
Using the Pathfinder Panel to Combine and Manipulate Shapes
The Pathfinder panel is invaluable for combining and modifying shapes. Imagine you have two overlapping circles: one red, one blue. To create a single shape representing only the overlapping area, select both circles, open the Pathfinder panel, and click “Intersect.” This leaves you with a new purple shape representing the intersection. To combine the shapes entirely, select “Unite.” To subtract one shape from another, select the shape you want to subtract *from* first, then select the shape you want to subtract *with*, and click “Minus Front.” Experimenting with these functions—and others like “Exclude” and “Divide”—allows for complex shape manipulation.
Comparison of Selection Tools
Illustrator offers three primary selection tools: the Selection Tool (V), the Direct Selection Tool (A), and the Group Selection Tool (A with a small square icon). The Selection Tool selects entire objects; the Direct Selection Tool selects individual anchor points and path segments within an object; and the Group Selection Tool selects objects within a group. For instance, if you have a group of shapes and want to move the entire group, use the Selection Tool. If you need to edit a single anchor point within a shape in the group, use the Direct Selection Tool. Understanding these differences is crucial for precise editing.
Utilizing Layers and Layer Styles for Organization
Complex designs benefit significantly from well-organized layers. Each layer can hold separate elements of your design, making editing and managing individual components much easier. Consider a design with a background, a main subject, and text. Each of these should reside on its own layer, labeled appropriately. Layer styles, accessed through the Layers panel, allow for quick application of effects like drop shadows, bevels, and strokes, further enhancing organizational efficiency and visual appeal. By grouping similar elements within layers and using layer styles, you maintain a clear and manageable workflow, even with the most intricate projects.
Creating a Gradient Fill with Multiple Color Stops and Blending Modes
Gradients add depth and visual interest to designs. To create a gradient fill, select your shape and open the Gradient panel (Window > Gradient). You can choose between linear and radial gradients. Add multiple color stops by clicking directly on the gradient bar. Drag the color stops to adjust their positions and the transition between colors. Each color stop allows you to specify a color and its opacity. Blending modes, accessible in the Transparency panel, influence how the gradient interacts with the underlying layers. Experiment with different blending modes to achieve various effects; for instance, using “Overlay” can create a more vibrant gradient, whereas “Soft Light” might result in a softer, more subtle transition.
Advanced Techniques for Vector Graphics Creation
Mastering the basic tools in Illustrator is only the first step. This section delves into more advanced techniques that will elevate your vector illustrations from simple to sophisticated, allowing you to create truly stunning and complex designs. We’ll explore how to leverage Illustrator’s powerful features to achieve professional-level results.
Building upon the foundational skills, we’ll examine methods to combine various tools and techniques to create intricate and visually compelling vector graphics. This includes mastering the use of blending modes, transparency, and patterns to add depth and complexity to your work, as well as creating and utilizing custom brushes for unique stylistic effects.
Complex Illustration Incorporating Various Techniques
Creating a complex illustration involves combining several techniques to achieve a desired visual effect. Let’s imagine designing a stylized cityscape at night. We could start by creating individual vector shapes for buildings, using the Pen Tool for precise Artikels. Different buildings could employ varying gradients and transparency levels to simulate light and shadow. A repeating pattern of small, subtly colored squares could represent the city lights, applied as a clipping mask to specific building sections. Blending modes like “Overlay” or “Soft Light” could be used to blend the city lights pattern with the building colors for a more realistic glow. The moon could be created using a simple ellipse with a radial gradient and a subtle glow effect applied through the Appearance panel. This layering and combination of techniques creates a far more dynamic and visually interesting image than simply using flat colors and basic shapes.
Using the Appearance Panel for Multiple Strokes and Effects
The Appearance panel is a powerful tool for non-destructive editing. Instead of applying multiple strokes and effects directly to an object, which can become difficult to manage, the Appearance panel allows you to layer these effects individually. For example, to create a stylized text effect, you could start with a basic text shape. Then, in the Appearance panel, add a thick, dark stroke. Below that, add a thinner, lighter stroke with a slight offset. Finally, add a subtle drop shadow. Each effect is independent, allowing for easy adjustment and modification without altering the underlying shape. This method is crucial for maintaining flexibility and control throughout the design process.
Creating Seamless Patterns
Illustrator offers several methods for creating seamless patterns. One approach involves creating a single repeating unit within a square or rectangular artboard. This unit is then tiled across the artboard using the Pattern Options dialog box, which allows you to specify the tile type (brick, grid, etc.) and the overall pattern appearance. Another method is to create the pattern elements individually, then use the Transform panel to precisely arrange them within the artboard to ensure seamless repetition. Careful attention must be paid to aligning the edges of the pattern units to avoid noticeable seams. Both approaches result in a repeatable pattern suitable for use in various design applications, such as filling shapes or creating textured backgrounds.
Vector and Raster Images in a Single Design Project
Vector and raster images each have their strengths and weaknesses. Vector graphics, like those created in Illustrator, are resolution-independent and can be scaled to any size without losing quality. Raster images, such as JPEGs or PNGs, are resolution-dependent and will become pixelated when scaled beyond their original size. In a single design project, you might use vector graphics for elements that need to be scaled (like logos or text) and raster images for elements where photorealistic detail is important (like high-resolution photographs). For example, a website banner might use a vector-based logo, text elements, and simple shapes, while incorporating a high-resolution raster image of a product. This combination leverages the advantages of both image types to create a visually appealing and flexible design.
Creating and Using Custom Brushes
Custom brushes dramatically enhance the creative possibilities within Illustrator. To create a custom brush, start by drawing the desired brush stroke using the Pencil or Paintbrush tool. Then, select the stroke and go to the Brushes panel. Choose “New Brush” and select the appropriate brush type (Art Brush, Scatter Brush, Pattern Brush, etc.) based on the desired effect. You can then customize various parameters within the brush options, such as spacing, rotation, and scattering, to fine-tune the brush’s appearance and behavior. Custom brushes can range from simple textured lines to complex, organic shapes, offering limitless opportunities for unique artistic expression.
Applying Design Principles and Best Practices
Effective design in Adobe Illustrator relies heavily on understanding and applying core design principles. Mastering these principles elevates your vector graphics from simply functional to visually compelling and impactful. This section will explore key aspects of design theory and how to implement them within your Illustrator projects.
Visual Hierarchy in Brochure Layouts
Visual hierarchy guides the viewer’s eye through a design, emphasizing key information and creating a clear reading path. A well-structured brochure, for example, should effortlessly lead the reader from headline to call to action. Consider the following mockups to illustrate this concept:
Imagine a tri-fold brochure. The front panel features a large, bold headline, “Discover the Future of Travel,” in a contrasting color against a visually appealing background image of a scenic landscape. The image itself is slightly blurred to allow the text to remain legible. The second panel contains smaller, but still prominent, section headings such as “Unforgettable Destinations,” “Luxury Accommodations,” and “Exclusive Offers.” Each heading is accompanied by a relevant, smaller image and concise supporting text. Finally, the third panel showcases a clear call to action, “Book Your Dream Vacation Today!” with prominent contact information and a website address, using a color that matches the headline for visual consistency. The use of varying font sizes, weights, and colors, combined with strategic image placement, creates a natural visual flow.
Effective Color Theory in Vector Graphics
Color plays a crucial role in establishing mood, attracting attention, and conveying brand identity. Understanding color theory—including the color wheel, complementary colors, analogous colors, and color harmonies—is paramount.
Consider a logo design. A technology company might opt for a cool color palette, perhaps using blues and greens to evoke feelings of trust and innovation. Conversely, a food brand might utilize warm colors like oranges and yellows to stimulate appetite and convey energy. Using a color scheme that is both aesthetically pleasing and aligned with the brand’s message is key. Furthermore, using high contrast between text and background ensures readability.
Typography in Professional Logo Design
Typography is more than just choosing a font; it’s about selecting fonts that accurately reflect the brand’s personality and message. Consider the logo for a law firm. A serif typeface might be chosen to convey a sense of tradition and trustworthiness, while a sans-serif typeface might be more suitable for a tech startup to suggest modernity and innovation. The font choice should be legible, scalable, and memorable. The spacing between letters (kerning) and lines (leading) should also be carefully considered for optimal readability.
Effective Use of Negative Space
Negative space, or white space, is the area around and between elements in a design. It’s not empty space; it’s a crucial design element that enhances readability and visual appeal. Too much clutter creates visual noise, while strategic use of negative space allows elements to breathe and stand out.
Imagine a minimalist poster. A single, high-quality image of a product is centered on the page, with ample white space surrounding it. This allows the product to be the clear focal point, preventing visual distractions. The contrast between the product and the background is striking and effective.
Scalability and Resolution in Vector Designs
Vector graphics are resolution-independent, meaning they can be scaled to any size without losing quality. This is a crucial advantage over raster graphics (like JPEGs or PNGs) which are pixel-based and lose quality when enlarged. The scalability of vector graphics makes them ideal for logos, illustrations, and other designs that need to be used across various platforms and sizes.
For instance, a logo designed in Illustrator can be used seamlessly on a business card, a website, a billboard, and even a large-format print without any loss of detail or sharpness. This inherent scalability is a defining characteristic of vector-based design, offering unmatched flexibility and versatility.
Conclusive Thoughts

By mastering the fundamental tools and techniques Artikeld in this guide, you’ll be well-equipped to harness the full potential of Adobe Illustrator. Remember, consistent practice and exploration are key to developing your skills. Experiment with different tools, techniques, and design principles to find your unique style and create impactful vector graphics. From simple shapes to complex illustrations, the journey of mastering Illustrator is a rewarding one, leading to a greater understanding of design and the ability to translate your creative vision into stunning visuals.