Creating effective maps requires more than just plotting points; it demands a thoughtful approach to visual communication. This guide delves into twelve crucial tips for designing maps that are not only informative but also captivating to the viewer. We’ll explore how careful consideration of visual hierarchy, color palettes, and interactive elements can transform a simple map into a powerful tool for conveying complex information in a clear and engaging way. From understanding the impact of whitespace to leveraging interactive features, we’ll equip you with the knowledge to create maps that resonate with your audience.
The principles Artikeld here apply to a wide range of map types, from simple location guides to complex thematic maps. Whether you’re a seasoned cartographer or a novice designer, this guide provides actionable strategies to improve your map-making skills and create visuals that are both aesthetically pleasing and highly effective in communicating data.
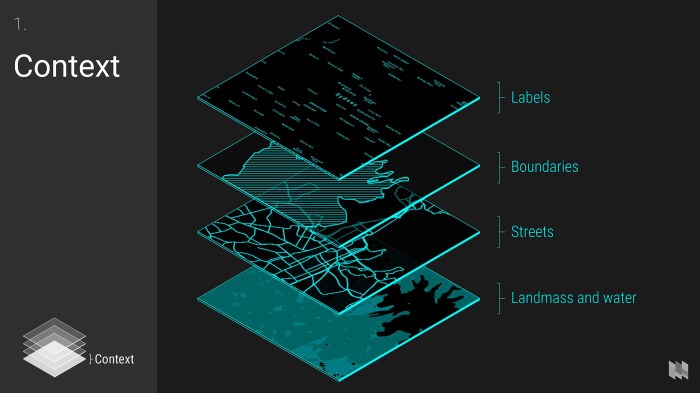
Visual Hierarchy and Clarity

Effective map design hinges on establishing a clear visual hierarchy and ensuring optimal clarity. This involves strategically using visual elements to guide the reader’s eye, emphasizing important information while de-emphasizing less crucial details. A well-designed map seamlessly communicates its intended message, leading to a positive user experience.
Achieving this requires careful consideration of several key aspects, including the strategic use of size, color, weight, and whitespace to create a visually appealing and easily understandable map. Poor visual hierarchy, conversely, can lead to confusion and frustration for the map user.
Visual Hierarchy Through Size, Color, and Weight
Different visual weights can be used to direct the user’s attention to key information. Larger elements, bolder colors, and thicker lines naturally draw the eye. This is particularly useful for highlighting important landmarks, routes, or data points.
| Element | Size | Color | Weight | Purpose |
|---|---|---|---|---|
| Major Roads | Thick | Dark Red | Bold | Highlight primary routes |
| Minor Roads | Medium | Light Gray | Medium | Show secondary routes |
| Points of Interest | Large | Bright Colors (e.g., Blue, Green, Yellow) | Bold | Emphasize key locations |
| Labels | Variable | Dark Gray/Black | Medium | Clearly identify elements |
Whitespace and Negative Space for Improved Readability
Whitespace, or the empty space around map elements, is crucial for readability and reducing visual clutter. It allows the eye to rest and prevents information overload. Negative space, which is the empty space within the map’s boundaries, serves a similar purpose, providing visual breathing room and enhancing the overall aesthetic appeal. A map overloaded with information without sufficient whitespace is difficult to interpret and can negatively impact the user experience.
Consider a map of a city. A well-designed map would use ample whitespace to separate streets, buildings, and points of interest. This allows the user to easily distinguish between different elements and navigate the map without feeling overwhelmed. In contrast, a cluttered map, packed with information and lacking whitespace, would be significantly harder to read and use effectively.
Comparison of Map Designs with Varying Visual Hierarchy
Let’s compare two hypothetical maps of a small town. Map A suffers from poor visual hierarchy. All roads are the same thickness, points of interest are small and inconsistently colored, and labels are cramped and difficult to read. The overall effect is cluttered and confusing. Map B, on the other hand, employs a clear visual hierarchy. Major roads are thicker and darker than minor roads, points of interest are larger and use a consistent color scheme, and labels are clearly spaced and easy to read. The result is a clean, easy-to-understand map that effectively communicates its information.
The key differences lie in the strategic use of size, color, and weight. Map B uses variations in these elements to prioritize information, while Map A lacks this distinction, leading to visual noise and reduced clarity. The strategic use of whitespace in Map B further enhances its readability, a feature noticeably absent in Map A. The difference in user experience between these two maps would be significant, with Map B providing a much more efficient and pleasant user experience.
Effective Use of Color and Symbology
Effective use of color and symbology is crucial for creating maps that are both informative and engaging. A well-designed color scheme and a clear, intuitive symbology system significantly improve a map’s readability and allow viewers to quickly grasp the information presented. Poor choices in these areas, however, can lead to confusion and misinterpretations. The following sections will explore best practices for leveraging color and symbology to enhance map design.
Map Legend Best Practices
A well-crafted map legend is essential for understanding the information depicted on a map. It acts as a key, translating the visual elements (colors, symbols, patterns) into meaningful data. A poorly designed legend can render even the most meticulously crafted map useless.
- Clarity and Conciseness: Use clear, unambiguous labels and avoid jargon. Keep the legend text concise and easy to read.
- Visual Consistency: Ensure that the symbols and colors in the legend exactly match those used on the map. Maintain consistent size and spacing for better readability.
- Logical Organization: Arrange legend items logically, perhaps alphabetically or by value range. Consider using a hierarchical structure for complex datasets.
- Visual Appeal: Use a visually appealing layout. Consider using whitespace effectively to avoid a cluttered look. Use a font that is easy to read.
- Accessibility: Design the legend with accessibility in mind. Use sufficient color contrast, avoid relying solely on color to convey information (consider using patterns or textures as well), and ensure the font size is large enough for those with visual impairments.
Examples of Color Palettes and Their Impact
Different color palettes evoke different feelings and can significantly impact how information is perceived. The choice of color scheme should align with the type of data being presented and the intended message.
| Color Palette | Description | Data Type Example | Visual Impact |
|---|---|---|---|
| Sequential (e.g., light blue to dark blue) | Shows a gradual change in magnitude or intensity. | Elevation, temperature, population density | Creates a sense of progression or flow; easily identifies high and low values. |
| Diverging (e.g., blue to white to red) | Highlights deviations from a central value or mean. | Temperature difference from average, election results | Effectively shows positive and negative deviations; zero point is clearly identifiable. |
| Qualitative (e.g., distinct colors for different categories) | Represents distinct categories or groups. | Land use types, political districts | Clearly distinguishes categories; color choice should be considered for ease of visual differentiation. |
| Categorical (e.g., different shades of a single color) | Represents distinct, unordered categories. | Soil types, geological formations | Provides clear visual distinction between categories while maintaining a unified look. |
Color Scheme for a Thematic Map: Average Annual Rainfall
For a thematic map depicting average annual rainfall, a sequential color scheme ranging from light beige (representing low rainfall) to dark green (representing high rainfall) would be effective. Beige represents arid or semi-arid conditions, transitioning through yellows and light greens to represent progressively higher rainfall amounts, culminating in dark green to represent areas of high rainfall. This color scheme is effective because it aligns with our natural associations: lighter colors with dryness and darker, greener colors with lush vegetation, which is typically associated with high rainfall. The gradual transition allows for easy visual interpretation of rainfall variations across the geographic area.
Interactive Elements and Engagement
Interactive elements are crucial for creating engaging and informative maps. By moving beyond static visuals, map designers can significantly enhance user experience and knowledge retention. This section explores how interactive features, such as drill-down capabilities and descriptive annotations, contribute to a more dynamic and effective map.
Interactive maps offer a level of engagement far exceeding their static counterparts. Users are no longer passive observers but active participants in exploring the data presented. This active engagement leads to better understanding and retention of information.
Drill-Down Functionality
A drill-down feature allows users to progressively explore data at increasingly granular levels. For example, a map showing national sales figures could allow users to click on a state to see regional data, then click on a city to see individual store performance. This layered approach facilitates detailed analysis and empowers users to discover patterns and insights they might miss on a static map. This interactivity fosters deeper understanding and encourages exploration. The visual feedback of zooming in and highlighting specific areas reinforces the information being presented, making it memorable and impactful. Consider a map depicting global population density; a drill-down feature would allow users to examine population density at the country level, then the province level, and finally, at the city level. This layered approach allows users to understand the global distribution of population more effectively.
Map Annotations with Descriptive Text
Effective annotation significantly enhances a map’s clarity and utility. Well-placed descriptive text can highlight key locations, explain complex phenomena, or provide additional context. For example, annotations on a historical map could identify significant battle sites and briefly describe their importance. On a geographical map, annotations might highlight specific landmarks, explaining their geological significance or historical context. Annotations should be concise, clear, and easily readable, avoiding jargon or overly technical language. They should seamlessly integrate with the map’s design, complementing the visual information without overwhelming it. For instance, a map showing the spread of a disease could use annotations to provide information about infection rates, hospital capacity, and implemented preventative measures in each location.
Comparison of Static and Interactive Maps
The following table compares static and interactive maps, highlighting the advantages and disadvantages of each approach in terms of user engagement and information delivery.
| Feature | Static Map | Interactive Map |
|---|---|---|
| Engagement | Limited; primarily visual observation. | High; allows for exploration and data discovery. |
| Information Delivery | Presents a fixed overview; less detail. | Provides layered information; allows for detailed analysis. |
| Data Complexity | Best suited for simpler datasets. | Can handle complex, multi-layered datasets. |
| Accessibility | Easily accessible; no special software required. | May require specific software or internet access. |
| Cost | Generally less expensive to produce. | Can be more expensive to develop and maintain. |
Final Summary

By mastering the art of visual hierarchy, color selection, and interactive design, you can create maps that are both informative and engaging. Remember, a well-designed map is more than just a collection of geographical data; it’s a powerful communication tool that can captivate, educate, and inspire. Implementing these twelve tips will elevate your map designs, ensuring your audience not only understands the information presented but also enjoys the experience of exploring it.